

*This post has been tweaked a little from its original 2009 publication. I've included a photo to the pattern for both the bunny and the mini pin all the at the bottom of this post as well as a newly fixed link within the post. Feel free to print to whatever size you like however the original is about 6 or 7 inches tall. Please make bunnies for you or your friends but kindly do not sell bunnies made from this pattern. Thanks : )
Are you like me and like to wait til the last minute to get your Easter crafting done? I thought so. I finally got around to getting a few gifts made and I think they turned out pretty cute. So I thought I'd share a 'sort of' tutorial for them. Please be patient and understanding as I've never done a tutorial before. If there's enough interest I will eventually turn them into a pdf file, but for now, here we go...
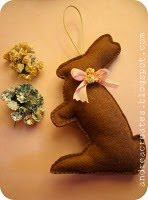
Instructions for a Felt Chocolate Bunny decoration :
For pattern click the link below
https://www.flickr.com/photos/andreacreates/3432975966/in/album-72157623600572650/
# 1: Fold a piece of felt at least 7x10 inches large, in half. I got mine here.

#2 Pin bunny pattern to felt:

#3 Cut out bunnies. (You should have 2 if you folded your fabric in half).
You will now have a bunny like this:

#4 Cut a cord, string or ribbon about 6 inches long. Compare your bunny to his inspirational muse. Your bunny should by now think he's made of chocolate too ; )
#5. At this point you need to pin the cord, looped over with both raw ends tucked inside the bunny near where the bunny head and ears meet. (You will be stitching over this from the outside). Sorry, I don't have a picture of this step, but if you use your imagination and some of the finished photos you'll be able to see it.

#7. Bring out your handy dandy stuffing fork (that you wish you had bought a long time ago)....and start inserting small pieces of your favorite type of fill. Start with the ears and work the filling into the face, paws, tail and feet.

The stuffing fork makes it easier, however, you don't absolutely need one.You can use the eraser end of a pencil, or a chopstick. Just make sure whatever you use is not too sharp or you'll poke through the felt. Ask me how I know : )


Then fill in the rest of the bunny, taking your time to smooth him out as you go so you don't get creases. Leave a little stuffing free space near the opening so you don't sew over it in the next step.

#9. Trim off excess, being very very careful not to clip your stitches....Don't mind that the picture shows this step before I stuffed and stitched him shut.

 of ribbons and assorted trims, and choose one for your bunny. I used this one from here. And paper ribbons from there too.
I cheated and hot glued them on, but you could stitch them too.Your bunny could also be embroidered before you stitch him shut. The possibilities are endless. ; )
 You're done! Admire your handy work.
For pattern click the link below
https://www.flickr.com/photos/andreacreates/3432975966/in/album-72157623600572650/
# 1: Fold a piece of felt at least 7x10 inches large, in half. I got mine here.

#2 Pin bunny pattern to felt:

#3 Cut out bunnies. (You should have 2 if you folded your fabric in half).

You will now have a bunny like this:

#4 Cut a cord, string or ribbon about 6 inches long.
 Compare your bunny to his inspirational muse. Your bunny should by now think he's made of chocolate too ; )
#5. At this point you need to pin the cord, looped over with both raw ends tucked inside the bunny near where the bunny head and ears meet. (You will be stitching over this from the outside). Sorry, I don't have a picture of this step, but if you use your imagination and some of the finished photos you'll be able to see it.
Check if Mr. (or Mrs.) Chocolate Bunny is hanging straight by the loop now, or make the necessary adjustments by moving the cord left or right so he/she is balanced...We'll wait for you....
#6. Sew bunny.
#6. Sew bunny.
Remember, the cord is in between the front and back pieces here. (Except in my photos it isn't, lol).
Leave about a 1 1/2 inch opening at the very bottom for stuffing. I used a blanket type stitch on my machine...

#7. Bring out your handy dandy stuffing fork (that you wish you had bought a long time ago)....and start inserting small pieces of your favorite type of fill. Start with the ears and work the filling into the face, paws, tail and feet.

The stuffing fork makes it easier, however, you don't absolutely need one.You can use the eraser end of a pencil, or a chopstick. Just make sure whatever you use is not too sharp or you'll poke through the felt. Ask me how I know : )


Then fill in the rest of the bunny, taking your time to smooth him out as you go so you don't get creases. Leave a little stuffing free space near the opening so you don't sew over it in the next step.
#8. Stitch opening shut, keeping stuffing inside and away from needle.
#9. Trim off excess, being very very careful not to clip your stitches....Don't mind that the picture shows this step before I stuffed and stitched him shut.

#10. My favorite part...
Now go through your piles, and piles, and piles....


Now go through your piles, and piles, and piles....

 of ribbons and assorted trims, and choose one for your bunny. I used this one from here. And paper ribbons from there too.
I cheated and hot glued them on, but you could stitch them too.Your bunny could also be embroidered before you stitch him shut. The possibilities are endless. ; )
 You're done! Admire your handy work.
*Bunny is meant to be a decoration~not intended for smaller children*


18 comments:
I think I might die of cuteness! Thanks for sharing such a thorough tutorial!
[inkihandmade.blogspot.com]
[inkihandmade.etsy.com]
What a beautiful tutorial! Love your blog, looking forward to reading your future posts =)
Awww! these are too cute and so cleaver! We may have to try some of these...
Thank you so much :)
Hello Andrea,
Love the tutorial, such a cute little bunny!
I have news for you! You won my little giveaway!
Could you send me your address via my email please and I shall post it off to you! My email is rachelwhitworth@gmail.com
I'm going to catch up with your blog now, so lovely!
Have a lovely day!
Rachel
So nice !!!
Marce
This is so cute for easter - and well explained!
Have a look at my blog - i've got a surprise for you in the latest post:
http://mvs-impressions.blogspot.com/2010/03/birthday-present-for-my-blog.html
These are so cute,thank you for the tutorial.
These are so cute!! :D
I tried this out and linked back to your lovely blog. The result is so cute. Thanks for your generous pattern!
http://letsgoflyakiteuptothehighestheight.blogspot.com/2010/03/chocolate-bunnies.html
I don't mind you mentioning my attempt at all! Thanks again! I love your spring blog header too!
Hi Andrea,
Love this! So cute! Can't wait to make some bunnies for the babies in my Mother's Group.
I've posted a link to your tutorial here:
http://justfordaisy.blogspot.com/2011/03/easter-craft-egg-stravaganza.html
Will put pictures on my blog and link to you again when I make them!
Thanks
Rebekah
thanks :)
can't wait to see them!
Well, I made 12 of them for Scarlet's baby friends Easter party... come take a look at: http://justfordaisy.blogspot.com/2011/04/easter-party-suzis-easter-bash.html
Thanks again for the tutorial, I copied your pattern freehand from the screen as I don't have a printer but loved the basic outline you came up with! :)
Thanks again
they look so cute! thanks for sharing :)
I can't wait to make one. Thank you so much for the time you took to create a tutorial.
Cute bunnies! Lovely tutorial Andrea!
Oooo ... I love this bunny, such a sweet post and "Yep" I leave EVERYTHING until the last minute, so glad I'm not alone!R♥
Post a Comment