Sunday, October 23, 2016

Fabric Collage Mini Patchworks

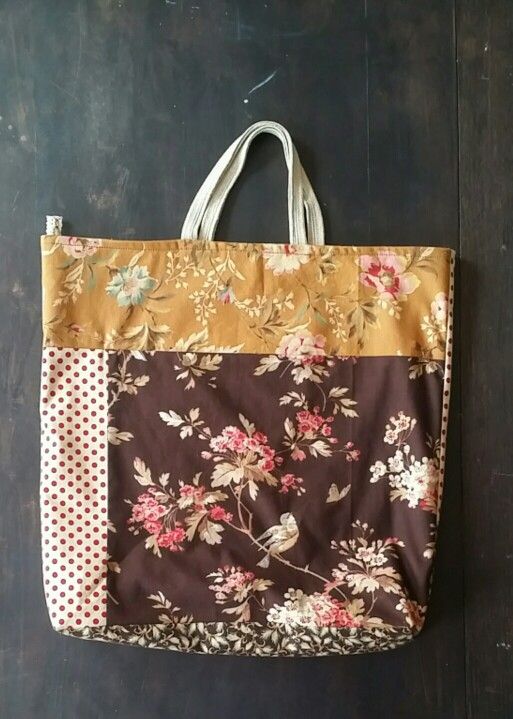
I admit-I hoard my fabric scraps. There are bags all over the studio. Color coordinated, designer somewhat coordinated... I just hate to waste and I like to challenge myself to make something useful out of tiny pieces. I had a whole day set aside and challenged myself to make 10 scrappy patchwork pieces that are each part of an actual project...to be shared when done...
After more than 9 hours with breaks for eating, laundries and so forth, I managed to finish 9 more  (1was already done). I completed 2 of the projects these are intended for and an entirely different one and started yet another when I started losing my crafty inspiration for these...Anyway here are a few of the 10 pieces that I started sharing over on instagram(link in sidebar➡)
Here they are all washed and drying in the sun.

This was the original piece. These are so fun to put together.

 These are pieced together in the same way as outlined in my article in Haute Handbags magazine (please see last post for info)

This one has a more modern, graphic feel.

Tuesday, October 11, 2016

Haute Handbags Autumn 2016

How fun! This is my 3rd time being published in Haute Handbags magazine!! It's such an honor and so exciting.
Find it here:
https://stampington.com/haute-handbags. It's on newstands now.


Wednesday, August 17, 2016


It's been such a busy Summer. I was finally able to go back 'home' to California for a vacation. It had been far too long since last seeing my family and I always long to go back some day. Anyway I managed to revisit some of my old favorite places and some new ones too. Here are some fancy ribbons and trim I found. I have been a bit under the weather and can't wait to start sewing up some projects with these soon
If you've missed my posts, I am frequently over on instagram @andrea1creates.

Wednesday, April 13, 2016

Haute Handbags Feature Spring 2016


I am so thrilled that Haute Handbags chose to feature a few of my bags in the latest Spring 2016 issue. Not just 1, but 4 bags ! It's been great fun and a wonderful experience. Here's a glimpse of my featured bags. You can find Haute Handbags at places like Barnes and Noble and Joann's etc...

My coin purse made the contents page : )

My Patchwork Bags


 This one is extra special to me because it features a photo of my grandma and her own mom who outlived her. I am fortunate that I knew both of these very sweet ladies. They are posing in front of a beauty salon my great grandmother owned...

Sunday, April 3, 2016

Stretchy Knit Boho Headband


I'm not sure what the correct term is for this style of headband is however I knew I wanted to make one myself after seeing them in the stores...
 I scoured Pinterest for a tutorial and could not find one pattern that didn't have either 2 'straps'  or just a long piece of jersey knit -often cut from a tshirt, wrapped in 2 loops around your head. Both ways are fine, however that was not what I was looking for because I only wanted 1 wide band and no raw edges. I am a little embarrassed to say this took me 2 days over a weekend to figure out and Easter morning I finally did it! With the help of my daughter whom I begged to 'please just look at it', lol. Interconnecting those loops turned wrong side out and when and how to sew each band and stretch fabric to boot.Too much for my brain ; ) But I did it and once I (we) figured it out it literally only takes 5-10 minutes to make.
I may just have to write a pattern or tutorial for it since I never did find one.Now I'm looking to make it completely seamless around the back-not too sure if it's even possible but I will try. Might take me 4 days. I've seen these in stores for up to $24.00 and this fabric cost me way less at JoannI can't remember if this was 1/4 or 1/3 yd but I made at least 2 from that.

Friday, April 1, 2016

New Yarn and Fabric Stash

I need to get better at posting things here as well as my instagram: https://www.instagram.com/andrea1creates/

The other day we went to Yarn It and Haberdashery in Columbus Ohio. Whenever we go on a trip I always scope out new fabric and knitting stores :)


This store was full of 'hard to decide which one to buy'yarns. I always try to choose things I don't see in stores near me and obviously had a color palette in mind(!) Not sure what I'm making yet, but I'll be ready...


 Also on this trip I had to stop by one of my all time favorite fabric shops-Sew to Speak also in Columbus. 
I could seriously be happy with 1 of everything in this store! Too hard to choose-I'll just have 1 of everything please, lol.
I have visions of headbands and other things like maybe some parts of tunics that I may try to get working on...


Sunday, January 31, 2016

Cotton and Steel Projects

 Just wanted to try and post these from my phone/ instagram andrea1creates (link in sidebar).

Some recent things I've been working on...
Above, this bag will hopefully get finished today. I am about to attach the handles but they come with little 'shield shaped' pieces in the same vinyl and I've never seen this before and wasn't sure what to do with them. So I slept on it and woke up thinking, hey I bet those get stitched on the lining side for reinforcement(!). No? Maybe not but I think that's what I'll try and do.
I dyed the pink linen lining myself. I have several pieces in different colors and these just (luckily )seemed to go well with this print.

Love these Cotton and Steel prints .(Sorry I can't figure out how to add links from my phone but a quick google search should work ; )
I tend to make things I need and this pouch was a result of the need for a wide opening, flat bottom bag that wasn't too tall so I could find my knitting and crochet notions at a glance.

And this bag. It had gone through several modifications before ending like this. At least the handles did. I tried 3 different ways and ended pretty happily with these.  The top bag will be the same shape, just vinyl handles.
All fabrics Cotton and Steel.

Thursday, November 26, 2015

Random Patchwork Bag Tutorial

I've been a little bag making crazy lately. All of a sudden I've gotten the urge to make these patchwork bags until I can't make any more, lol.  After some recent compliments on my rosy tote shown on my instagram page here and here and a detail section here I was inspired to make more...I have 2 very large boxes of fabric remnants ranging in size from 1x1 inch, maybe even smaller(!) to about a 1/4 yard-maybe a little bigger (!)  I've made 3 totes in just the last few days, and have not even come close to making a dent in my boxes! These are great for (most people's) stash busting- They are lots of fun, coming together in a random patchwork way- the end result ends up being a surprise even to me :)

Another, recent bag is also on instagram@andrea1creates

Here's a tutorial on how I put the bags together. 
No 2 totes are alike even though I generally start out with the same size 'base'. The final dimensions end up depending on how many remnants I have that go together. The surprising end result is what makes them so fun to make!
Please keep in mind these totes are for lightweight things. I use mine to take a snack to work and a small book or 2, my hat and a notebook or maybe a knitting project.
It does help to have a little patchworking experience but not necessary as I explain what you need to do in the basic directions below. I have never done a proper patchwork project that required meticulous sizes or precise cutting- I just patchwork as I go!


What you'll need:

*Lots of fabric scraps. I like to use my quilter's weight cotton remnants. Enough to cover a good 20 x 20 square inches
*A lining-also lightweight or maybe a homespun woven, or home dec. (I usually use what I have enough of on hand) 18 x 18 inches
*Muslin base 18 x 18 inches
*Woven twill tape handles or other similar sturdy ribbon works well too (not wired) about 26 inches.
* Optional: a short ribbon scrap about 3 inches long, crochet lace trim, a doily or buttons-embellishment possibilities are endless.

Prepare your pieces:

Start by cutting 2 pieces of muslin 18 x 18 inches square. This will the base to which the patchwork will be attached.
Cut 2 handles about 13" long-You can make them longer just make sure they are both the same length.

You can cut 2 lining pieces 18 x 18 inches now or save that for later when you know exactly how big the exterior piece will be.
Next gather your fabric remnants, pressing them and cutting the edges so that they are straight- either squares or rectangles. They do not need to be perfectly even (mine are not always) but it does help in the sewing process.

Begin patchworking:

These bags can be done in many different ways obviously all depending on the size of your remnants. The bags shown above used up fairly large scraps so I did not need to do too many 'rows' (for example the beige bag used only 1 piece for the 1st 'row' and 2 pieces for the 2nd row and again 1 for the bottom on it's front side)

The following is a basic example of how I patchwork as I go ...

1st row - start by laying the largest/ focal remnant piece flush in the upper left corner of one of the muslin bases. With a narrow seam allowance, baste this piece down along it's right side edge (it does not need to cover the entire height (or width) of the muslin base but if it does, hey you'll be done even quicker!). 

Now choose a 2nd remnant and cut it to as close to the same height as the 1st basted remnant. If it is not the same height of the 1st remnant, find another scrap (and if necessary, a 3rd and so on) and stitch them together(right sides facing,then pressing seams open) until this new piece measures the same height as the first basted remnant. 
Place this 2nd piece on top of the 1st basted piece, right sides together and with a regular stitch length stitch the 2nd piece to the 1st basted remnant along the right side. Press this seam open. On the front, press the stitched seams. Continue in this manner until you have covered the width of the muslin base.

2nd row - If you have not covered the entire height of the muslin base with row 1 start on the 2nd 'row':
Lay out the remnants for the 2nd row until a few inches more than the width of the muslin base is covered. Stitch them together pressing seams open, then stitch this 2nd row to the 1st row. Press this seam open. Press on the front side of the seams.

Check to see if the entire muslin base is covered. If not, continue with a 3rd row and or adding to the sides and so on if necessary, in the manner above until it is.

Repeat for the 2nd muslin base/back of the bag in the same way.

If you want to add lace trim do so now. 

If your bag's front and back pieces are not the same size, lay one on top of the other and trim edges even. Note these measurements to make the lining later.

Stitch bag front and back pieces right sides together with a 1/2 " seam allowance down the right, bottom and left sides. Press seams open. Cut a 1 inch square from both bottom corners of the bag to make a gusset. Line up and stitch the side and bottom seams together.

Find the center of the bag and mark with an erasable marker or pin. Now measure over 2 inches on either side of this mark and pin the handles in place with the ends flush to the top of the bag. Repeat for other handle / side of bag and stitch in place twice (once with a narrower seam allowance).

Now cut 2 lining pieces to the dimensions you noted from your bag's evened up exterior pieces. Stitch right sides together as you did the bag's exterior pieces except this time leave about a 4 inch opening at the bottom. Again, cut a 1 inch bottom square from each bottom corner for the gusset and press seams open. 

If you are adding a ribbon tab to the top of the bag, do so now. I cut about a 3 inch length of ribbon, folded in half and stitched to the exterior side seam in the same way as the handles.

Place the lining inside the exterior bag right sides together and pin the side seams and handles so they are aiming straight down, Stitch around the top with a 1/2 inch seam allowance. Press seams.

Pull the exterior through the lining opening and topstitch. Stitch lining opening closed and voila~ a new random patchwork tote!


Saturday, October 10, 2015

Fall Sale

In celebration of my feature in the Autumn issue of Haute Handbags, I am having a special sale for blog readers and those who have come via the magazine.
If you enter coupon code :FALLHH2015 at checkout you can receive 15% off, now through the October 31st, on anything in my shop. 

Lots more to choose from in the shop : )

Thursday, October 1, 2015

Haute Handbags Feature

So super excited- my Patchwork Project Tote was included in the current issue of Haute Handbags , Autumn 2015!!


To celebrate- blog readers can take 10% off anything in my shop with coupon code
HH102015
at checkout. Now, through October 8th.

Saturday, September 5, 2015

Folk Style Zipper Pouch


I've been hoarding this print by Anna Maria Horner (link in sidebar) for so long. I almost made something tiny with it and decided to go ahead and use almost all of it and make another rounded bag. I love this shape and zipper bags are so practical.
This fuzzy orange soft lace has also been floating around the studio for awhile and I thought the 2 went so well together I paired them up here. There's also a vintage blue button sewn to the front. Currently in the shop...

Friday, September 4, 2015

Tiger Lily Zipper Bags


Love these new Tiger Lily prints by Heather Ross.
The top bag is a rounded zip pouch of my own design-love making little bags : ) I added a band of a coordinating print to the top with a vintage button and lace tab to the side....
The bottom one is a 'cats and balls of yarn' theme- I thought it was so cute and perfect for another project bag.This one has a 'tag' I stitched over a bit of lace  and a tab on the side...Both currently in the shop now...

Saturday, August 22, 2015

Little Card Wallets


what is wrong with this wallet?

A little card wallet- I haven't been able to get much sewing done lately and now that I have a day off, I was struggling to find a small project that I could complete from start and finish. Of course I thought I had enough supplies....Did you find the missing snap half? Lol...I guess I'll have to buy more.So much for completing a project today, but I do love little ones like this-not much fabric, little pieces of trim and practical!...I'll probably be making more soon : )

Friday, August 21, 2015

Little House Tealight


I made this little tealight house for my mom's birthday. Inspired by Cathe Holden's, which can be found on her website here. You can find various house templates on Pinterest, but she has one on her site if you click on the 'freebies' link. I have so many stickers and papers and things that I thought I could probably make a dozen more for the holidays cause they're just so fun to decorate! The little girl is from Tim Holtz-found at Hobby Lobby. She reminded me of a frozen Charlotte-which my mom loves so I added her too...

Saturday, July 18, 2015

Fabric Basket Tote Tutorial

As a crafter, you can never have too many bags, baskets or totes for supplies, right? I use them to stash a project to take with me when going out-or to organize WIP's around the house.

I had a paper shopping bag with a single handle attached like this one and thought it would be fun to recreate something similar from fabric.

it folds up just like so -press with an iron to help recreate the side folds of the 'basket'.
Would you like to make one? (I didn't take step by step photos because I think the directions are pretty (hopefully) straightforward if you've ever sewn a tote, especially). 
 Here's what I did:


Supplies:

I used a piece of freezer paper to create a template-you can do this too, it makes cutting the gusset corners (and making more bags) easier for me-or just cut the fabric pieces to the indicated sizes directly.
Finished bag size: about 7 inches wide x 8 inches tall x 4.5 inch gusset.

  • 2 pieces of exterior fabric cut 11.25 inches tall x 12.5  inches wide
  • 2 pieces of lining fabric cut 11.25 inches tall x 12.5  inches wide
  • 4 pieces of lightweight fusible interfacing cut 11.25 inches tall x 12.5  inches wide
  • 1 piece of twill tape 17 inches long. I used one that was 2 inches wide-you can use whatever you like, but I think a minimum of 1 inch wide works best.
  • Optional- a 2.5 inch square scrap of coordinating fabric for the tab
  • And of course, basic sewing tools


All seams are 1/2" unless otherwise noted
I chose a favorite Cotton and Steel print and paired it with a gingham lining. I added a twill tape handle and tab on the side in a coordinating cotton and steel print. 


  1. Begin by making a paper template 11.25 inches tall x 12.5 inches wide (or cut sizes directly from fabric pieces-if you do, skip step 2). 
  2. Using the template, cut 2 from the exterior fabrics, 2 from the lining fabrics and 4 from the lightweight fusible interfacing.
  3. Cut a 2.75 inch square from the 2 bottom corners of both exterior, lining and interfacing pieces.  To help make sure the gusset squares are exactly the same size I like to fold the fabric in half and cut the 2 bottom corners at the same time.
  4. Fuse the interfacing to the wrong side of the exterior and lining fabric pieces according to the manufacturer's instructions.
  5. Stitch the left, right and bottom seams of the lining pieces. Press seams open.
  6. If making the tab, continue here or skip to step 7. Make the tab by folding the 2.5 inch square in half. Open it up and then press the 2 raw edges toward the pressed center crease. Fold it in half again on the crease. Stitch down the 2 longer sides with a narrow seam allowance. 
  7. Now fold the tab in half and pin it about 1 inch down from the top right side of the exterior front piece matching raw edges. Stitch in place.
  8. Stitch the left, right and bottom seams of the exterior pieces carefully going over the tab if you made one. Press seams open.
  9. Make the gussets by matching up a side to a bottom seam on one of the exterior pieces and pin in place. Make sure the 2 seams are facing opposite directions so they lay flat. You should be able to push the seams together until they are right up against each other. I like to stitch a narrower seam within the seam allowance for durability and  I also like to pink the edges with my pinking shears. Repeat for second exterior and both lining pieces. Press seams
  10. With right sides together place the lining inside the exterior piece and stitch all the way around the top leaving a 2-3 inch opening for turning. Pull the lining through the opening and push it down into the bag's exterior. Topstitch with a narrow seam allowance.
  11. To attach the handle: Fold the front and back of the tote in half to press a center crease. If wide enough, fold the end of the twill tape in half to find and mark it's center as well. Starting at the top of the bag, and on the center crease, measure down 4 inches and  mark  the 4" point with a water soluble fabric marker. Fold under 1/2" of one end of the twill tape. Center the twill tape's folded end on the center mark with the raw edge underneath, facing the bag. Pin on both sides of the twill tape up to the top of the bag. Make sure it is centered. Stitch around the pinned section of the handle and stitch a center 'x'. I like to start stitching on the topstitching stitches and then go around all of the handle section's stitches twice for reassurance. Repeat these steps to attach 2nd half of the handle to the bag's back.
  12. To create the side folds: press a crease from one bottom corner to the top parallel to the side center seam. Repeat with the other 3 corners.
 Your fabric basket tote is now ready to use

Sunday, July 12, 2015

Tutorial for a Generous Zipper Pouch, Knitting Tool Bag or Makeup Bag

I like to make generous sized zipper pouches for knitting notions and other small projects. They're practical for 'on the go crafting' or to use for other things, such as a makeup or pencil bag.
I haven't been able to knit or sew as often as I want lately so I thought I'd start jotting down notes for tutorials as I go-If you like this pouch and don't feel like making your own-it will be in my etsy shop : )

with 16" circular needles-as you can see it will fit quite a few notions!
Supplies
  • exterior: 2 pieces of canvas, linen  or heavier weight fabric 10.5 inches tall x 11 inches wide
  • lining: 2 pieces of quilter's weight cotton 10.25" x 11"
  • cotton batting- I used Warm and Natural 10.5" x 11"
  • 12 inch zipper -I used YKK
  • 1" wide twill tape tab or ribbon (optional) about 4 inches
  • basic sewing tools

To Make

Start by cutting out your pieces: Cut 2 exterior pieces 10.5 inches tall x 11 inches wide. 2 batting pieces the same dimensions as the exterior pieces and 2 lining pieces 10.25 inches tall x 11 inches wide (lining is cut shorter so it fits inside the bag nicer).
All seam allowances are 1/2" unless otherwise noted.


Lay one piece of exterior fabric onto a piece of the batting:


 Next, place the zipper, teeth down (flatter side facing you) and with the pull to the right . Pin and stitch with a zipper foot:


Next, lay the lining piece face down on top of the exterior/zipper/batting pieces so that both exterior and lining are right sides facing. Pin and stitch lining to exterior/zipper piece with your zipper foot:


Fold back pieces so they are wrong sides together and repeat for the 2nd zipper side and remaining fabric pieces in the same way (see photo below)

Now lay both sides away from the zipper and press, carefully avoiding the zipper teeth:
pieces folded away from zipper , ready to press.


On the front side of the bag and only on the exterior/batting piece (fold lining away), measure down 2 inches on the right side. Fold the twill tape in half and place raw edges of the tape just over the right side of the exterior piece.  Stitch with a narrow seam allowance.


Now separate the exterior and lining pieces as shown below.
Pin all the way around but first carefully line up the zipper, and aim the teeth toward the lining-(see photo below) pin in place on the zipper. Repeat for 2nd side.Take your time sewing here or you may break a needle and mess up your tension.


Stitch all the way around leaving a 3 inch opening for turning at the bottom of the lining piece.

With a water soluble or air dry fabric marker, and starting at the side and bottom seam line, measure and mark a 3/4 " square as shown

Repeat for 2nd exterior and both lining pieces.

Pin together carefully matching side and bottom seams. Pin and stitch.Go back over with a zigzag stitch within the seam allowance.
Turn the bag right side out and tuck the lining into the exterior. Your bag is now finished.


Blog Widget by LinkWithin