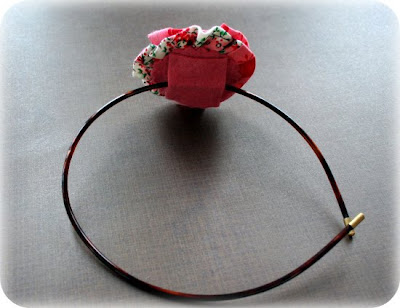
This one is a gift but I think it turned out pretty nice, so I might make some more and put them in the shop.
Here's a little "Sort of Tutorial"- you may or may not remember the first one here. (If there's an interest I can make a more detailed instruction soon)
1. First, look through your box of fabric scraps:
 If you don't have a ginormous amount of scraps like me, you can choose one or several cotton prints depending on the look you're going for.
2. Next, cut your pieces.
- Using my rotary cutter I trimmed the pieces approx. 1 1/2 inches wide x, as long as the scraps were, long. Most of my scraps are no more than 2~3 inches inches.....This is a great way to use them up :D
3. Sew them together by the short ends.
- I made a strip about 15 inches long. I don't remember the exact measurements, I'm just sort of eyeballing it right now-note to self: I can edit that later when I make another one ; ). It also depends on how big you'd like your ruffle flower to be. This part is somewhat like making bias strips....
4. Press all of the little seams to one side.
5. Sew with a basting stitch.
-I placed wrong sides together matching the long raw edges.Then basted from one end to the other- (I back stitch at the beginning)
6. Gently pull the threads to gather the strip.
7. Turn the ruffle 'round and 'round on itself into a circle shape.
8. Hand stitch from the bottom to the top through the center to tack it in place.
-I also stitched a few of the layers together so the raw edges in between don't show.
9.Look through your box of felt scraps:
 Choose a coordinating color of felt from your felt scrap box. Or just cut a piece from a larger piece if you don't have a ginormous box of felt scraps ;)
-I cut a circle with my scallop edged scissors just a little smaller than the back of the flower ruffle, and glued it on with "gem~tac". I usually use gem~tac to glue fabric to metal pin backs.
10. Glue ruffle to headband using another small rectangle of felt and more gem~tac.
-I stuck the point of the headband into a basket to hold it up straight while the glue was drying.
I found these headbands at ULTA-they're super skinny, but stay on well. You could use any headband you like of course.
I might add buttons or some other type of embellishment to the center of the flower next time.
Voila ~ you're done. Enjoy :D


4 comments:
Pretty headband!
http://christiecottage.blogspot.com
these are adorable! thanks for sharing. :)
Hi Andrea! I just discovered your blog & LOVE your work! The headband is adorable (my daughter would love it) & I love the vintage kitty brooch. I'll be following! Merry Christmas ~ Jill
My 6 year old loves wearing headbands so much, she sleeps in them. I've been thinking about jazzing them up for a while and this would be perfect. Thanks.
Post a Comment